Violin Care for Beginners
How to Replace a Violin String Safely
Replacing a violin string is manageable when you work slowly, change only one
string at a time, keep the string seated correctly in the nut and bridge, and
watch carefully for changes in the bridge position.
Quick Answer
Loosen and remove one old string, attach the new string at the tailpiece,
guide it through the bridge and nut grooves, insert it into the correct peg,
wind it neatly, and raise the pitch gradually with a tuner.
Never remove all four strings at once. The bridge can fall or shift, and the
sudden loss of tension may create additional problems.
Violin strings eventually wear out, unravel, lose their tone, or break. Learning
how to replace a violin string can save time and help students understand basic
instrument care. However, the process should be done carefully because the bridge
is held in place largely by string tension and can lean or move while a new string
is being tightened.
Before Replacing a Violin String
A few checks before you begin can prevent damage and make the new string easier to install.
Buy the Correct String
Make sure the replacement is the correct E, A, D, or G string and is designed
for the proper violin size.
Replace One String at a Time
Keeping the other three strings under tension helps support the bridge and
preserve the instrument’s setup.
Use a Chromatic Tuner
A clip-on tuner or tuning app helps prevent the new string from being tightened
above its correct pitch.
Work on a Stable Surface
Place the violin safely on your lap or on a padded table where it cannot slide or fall.
How to Change a Violin String Step by Step
Follow these steps slowly. Do not force the peg, pull sharply on the string, or
continue tightening if something appears out of position.
Turn the tuning peg slowly until the string becomes completely loose. Do not
pull the peg outward unnecessarily. Once the tension is gone, unwind the string
from the peg.
2
Remove It from the Tailpiece
Release the ball or loop end from the fine tuner or tailpiece. Notice how the
old string was attached so the replacement can be installed in the same location.
Place the ball end into the tailpiece or fine tuner. Some E strings use a loop
end instead of a ball end, so confirm that the replacement matches the setup.
4
Position It in the Bridge and Nut
Guide the string into the correct bridge groove and the matching groove at
the nut. The string should follow a straight, natural path.
5
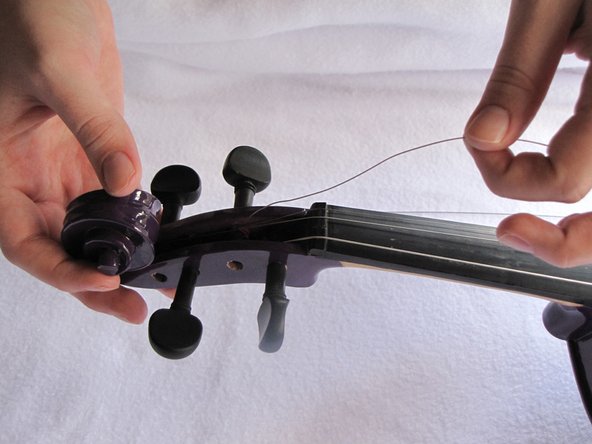
Insert the String into the Peg
Pass the thin end through the small hole in the correct peg. Leave only enough
slack to create several neat windings around the peg.
Turn the peg in the direction that tightens that particular string. Guide the
windings neatly toward the pegbox wall without excessive overlapping.
Bring the string up toward pitch slowly. Recheck that it remains in the
correct bridge and nut grooves as the tension increases.
8
Tune to the Correct Pitch
Use a chromatic tuner and approach the pitch from below. Standard violin tuning
is G, D, A, and E from the lowest string to the highest.
Standard Violin String Pitches
Use these pitches when tuning a standard four-string violin.
| String |
Pitch |
Position |
| G |
G3 |
Lowest and thickest string |
| D |
D4 |
Second-lowest string |
| A |
A4 |
Second-highest string |
| E |
E5 |
Highest and thinnest string |
Watch the Violin Bridge While Tightening
New strings can pull the top of the bridge toward the fingerboard as they are
tightened. Look at the bridge from the side and make sure it remains upright.
If the bridge is leaning noticeably, has moved out of position, or appears twisted,
stop tightening and ask a teacher, violin repair technician, or luthier for help.
Why Does a New Violin String Keep Going Out of Tune?
New violin strings usually need time to settle. It is normal for them to lose pitch
repeatedly during the first practice sessions.
Retune Frequently
Check the pitch several times during the first few practice sessions.
Avoid Pulling Hard
Do not yank the string upward. Normal playing and gentle retuning will allow it to settle.
Check the Windings
Loose, crossed, or slipping windings around the peg can cause unstable tuning.
Use the Fine Tuner
Once the pitch is close, make small adjustments with the fine tuner when one is available.
Common Violin String Replacement Mistakes
Avoid These Problems
- Removing all four strings at once
- Installing the wrong string or wrong size
- Winding the string onto the wrong peg
- Allowing the string to leave its groove
- Tightening too rapidly
- Ignoring a leaning bridge
Better Habits
- Change one string at a time
- Confirm the string label first
- Follow the existing string path
- Wind the peg slowly and neatly
- Approach pitch from below
- Stop and seek help when something looks wrong
Frequently Asked Questions About Replacing Violin Strings
These direct answers address common questions about how to change a violin string safely.
Can a beginner replace a violin string?
Yes, with careful instructions and adult or teacher supervision.
Should all violin strings be removed together?
No. Replace one string at a time so the remaining strings continue supporting the bridge.
How often should violin strings be replaced?
Replace a string when it breaks, unravels, loses tone, or becomes difficult to tune.
Why does the new violin string keep slipping?
The string may still be settling, the peg may be slipping, or the windings may be loose.
Can you replace only one violin string?
Yes. Replacing only the damaged or broken string is perfectly normal.
When should a repair shop replace the string?
Seek help if the bridge moves, the peg sticks or slips, or the new string repeatedly breaks.
Ask for help when needed:
If the bridge falls, the soundpost appears loose, a peg will not turn safely, or
the instrument shows a crack, stop working and consult a qualified repair technician.
The Bottom Line
To replace a violin string safely, change only one string at a time, attach the
replacement correctly at the tailpiece, keep it seated in the bridge and nut
grooves, wind the correct peg neatly, and tune upward slowly. Watch the bridge
throughout the process and stop immediately if anything shifts.